Welcome to my little slice of the internet. If you've found your way here through my Youtube videos thank you for taking the time to come on over. I hope you 'll see something you like and will stop by again. If you've just happened upon my blog the same welcome to you but why not scooch on over to youtube to my channel and have a look at my videos.

Monday, April 18, 2011

Back with a project.....

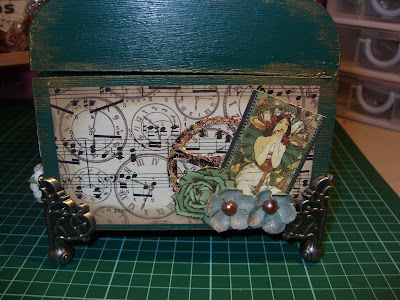
I know I've  been lax and haven't posted for a few days but I'm back with some projects I've been working on. I bought a load of things to alter and this last week I decided to alter one of the boxes I bought from cuddlybuddly.com  with my steampunk debutante paper. 

Here is a list of the supplies I used:
1 plain box
Steampunk Debutante paper
Tim Holtz gears
Tim Holtz watch faces
Tim Holtz box feet
Tim Holtz ornate book plate
Vintage sheet music
Clock background stamp
Distress ink frayed burlap,
Versafine antique sepia (something like that it's at home on the shelf in my craft room so I can't check)
Glossy accents 
acrylic paint
MODPODGE
Mulberry flowers from thehobbyhouse.co.uk
Just the one sheet of the flying man paper. I glossy accented the fish and added a couple of rub ons from a 7 gypsies rub on pack.


First I painted the whole box using a teal paint I mixed up myself as I didn't have the colour I was looking for. I rubbed a little gold acrylic paint along the edges for a bit of shine and then once try covered the whole thing in modpodge to protect it a little. 

I took a couple of sheets of vintage sheet music and stamped all over it with a clock face stamp. After cutting to size I used distress ink in frayed burlap on the edges to age it a little.  The charm I used on the front I just put together using a couple of beads and an eye pin. I hung it using a lobster clasp to the lock on the front. It's a tight fit but it does close properly
This is the front of the box, I've decoupaged of sorts using cut outs from the ladies collage page. Using a Tim Holtz sprocket gear I framed one of the ladies in the stamp. You can't really tell but I flooded it with glossy accents and let it dry. It's rather pretty I think.

 
    I made some gears using black card and drawing round one of the Tim Holtz masks.  I used glue and gilding flakes to give it a bit of shine. The watch face was glued on using Silicone glue to lift it above the decoupaged blue roses and gears.

Another of the gears made by drawing round the Tim Holtz mask and then using gilding flakes.  This is a closer view of the Prima flowers I coloured with my Verdigris Mist.
Tim Holtz ornate plate backed with some of the rose paper from the steampunk collection. A tiny rose on a sprocket and some bling. I only have 2 pieces of bling on the box the gems in the book plate and the 2 flower centres on the side.
Just a look at the side showing the Tim Holtz box feet.

The plain back of the box. I could have added details to the back but I like it as it is.
I had intended to put flowers and feathers on the top but each time I put something there it just didn't look right. Usually my work tends to be packed with decoration but this one seemed to want to be quite simple. So rather than force it and not be happy I left it and I actually really like it. If you want to see more I have  video on youtube about this box. 
Have a happy time crafting Hanxxx

Monday, April 11, 2011

Ok still no pictures...

No pictures again today but I'm getting there. I made my charms this morning (not that I know I am in the swap yet as it hasn't been updated) so I'm ready. The instructions were that they could be different and in any colour but I've made 5 of one kind and 5 of another as I asked for 2 spaces in the swap. I mean if I'm sending 5 charms I might as well send 10. I've also confirmed I am in a swap hosted by the lovely Leonie Castro for a Tim Holtz swivel clasp charm swap. I've been buying like a demon and I'm going to make vintagey steampunky lovelies. With a bit of vintage England added in (at least that is the plan will have to see if it works but I bought the drill bits required!).

I just have to decorate the tags for the ones I have already made and then I can take pictures of the completed things. Have to wait for the contact details of the hostess to send them off if I do get the places I asked for. But either way I'm going to put them on here so you can tell me if I am heading in the right direction with them. 

Also another discovery not only am I addicted to the mariposa papers the steampunk debutante papers have snuck inside and lodged themselves in my heart. I just bought 3 sheets of each of the 12x12 papers 2 of the tag sheets and 1 of the frames sheet. I have the 8x8 stack and I've used 2 pieces of that and it hurt I tell you! But I just had to stock up on them. But you know how it is lol. 


So not really much to say today, really just a quick note and a promise of better posts. Have a lovely evening and enjoy whatever you are doing. xxx Han

Sunday, April 10, 2011

Swap anxiety....

Hey everyone. Happy Sunday to you all. Its beautiful weather here in the UK sunny and warm and here I am in work looking at it out of the window!!! What a waste but I suppose if I want to keep spending I have to do the work to earn the money.

For the past 2 days all I've done is watch videos on youtube on charm swaps. I've made the plunge and asked to be in 2 swaps from the life on the {scrap} beach website. Both charm swaps and now I'm in a panic over not making things good enough. I've got a background in jewellery making (mostly charm bracelets bursting with charms and beads ets) so I should be ok but I'm worried that I'll let people down. I think I know what to expect as I've watched all the videos I can find and I've read and re-read the information provided in the sign up pages. 

I know the lovely ladies out there in the scrapbook community are wonderful people and wouldn't jump on me like a bug but I just wanted to get it out there. 

Oh and another thing does anyone know how long it takes to ship things to America? I want to make sure I send them off with plenty of time.

I'm going to start making some tonight and I'll post some pics see if anyone can tell me if this is the sort of thing I should be doing. I might take some pics of the jewelery I've made as well seeing as I am still working on my altered box and it isn't finished yet and I haven't added any pictures for a few days. 

This blog seems to be diversifying day by day. I started it to become involved in something and to show off my scrapping journey but it seems to be more about my creative journey rather than just a scrapping journey. I've watched peoples videos and I see that people aren't just one thing. People are mixed media artists, scrapbookers, card makers, altered art makers jewelery makers. Perhaps I don't have to be just one thing perhaps I can just be a crafter and be happy.

So today I've had insecurities and revelations pretty good I think. I hope the day finds you well and enjoying the time off in whatever way makes you feel happiest. 

All My Love 
Han

Friday, April 8, 2011

Inspiration or copying?? and a little Mariposa project,

Hey All,I'm struggling with something. I watch youtube videos on projects and tutorials and am obviously inspired by them. What I worry about is that I end up copying them. I mean how much of it can be me if I'm pulling bits and pieces from other people's work? Can I claim it as my own work if in my eyes it looks like everyone elses?? 

I know I'm still learning this and it's only been 3-4 months since I started any of this but it's something I worry about all the time. I suppose you could say that when we are using the same products there are limitations to how many variations of things you can have. So it stands to reason  things will be similar and that if someone shares something beautiful or a new idea, then we are going to want to try and make it ourselves. So I ask you where is the line drawn? When am I ceasing to be an "artist" and merely becoming a forger??

I'm trying to think of original things to do but at the moment I have limited resources so it can be a challenge. I really need to get a die cutting machine but I'm having to prioritize things on my to get list and the big shot keeps moving down the list. I'm also searching for alternative things I can use as the supplies in the UK are just so expensive something like double the price. I'd love to go to America and have a great craft stash buying holiday but I haven't been on Holiday for years. Infact the last time I left the country I was 16 I'm 27 now. But that's a whole set of insecurities brought on by a parent and his big mouth. 

Ok enough of that until I get my current altered box completed I think I'll post just a little look at a small altered chest and mini I made for my Mum. 

Mariposa Mini and storage chest....

 I made this Mini using a small  cardboard treasure chest I got at hobbycraft, some champagne gold acrylic paint and what I had left of the Mariposa mat stack after making my Mariposa Mini. Just a little gift for my Mum, I haven't got round to putting pictures in it yet as I have to find some.


Red Medici flower from Prima say it in crystals bling from Prima


 I had to cut out each of these pages by hand as I don't have a die cutting machine. My hands were in pieces lol.
Acetate butterfly left over from my mini


I made this charm using a swivel clasp found on Ebay, Tim Holtz Fragments some crystal drops and metal charms.


Well that is about it for today, who knows I may feel inspired later and come  back with another post. Thank you for reading.
Han xx

Thursday, April 7, 2011

My first altered canvas.. Vintage Ladies

Hi everyone, I've spent the last 3 evenings working on my first altered canvas and I finished it last night. I took some photos and made a few quick videos of it before going to bed so I thought I would share them with you this morning.

  I'll just go through some of the details see if I can explain what I did with what.


 I made the lollipops by free handing rough circles on torn out book pages. I cut them out and inked the edges in frayed burlap and then walnut stain. The layers were glued with glossy accents and the centres just random buttons I had in my stash.


Made by backing book page flowers on acetate with mod podge then heating the acetate and shaping and holding it while it cools. Just done to give them a bit more substance than paper alone.  I used stickles on the edges just for a bit of sparkle. I actually made the 4 sets of petals intending to use them as one flower but it was too full so I separated it and used it as two. I don't have a punch or die for the flowers so I followed a video I saw on Youtube a long time ago. I've just tried to find it again so I could say who it was but I can't find it sorry.
 The "fan" was made by  cutting a rough semi circular piece of card and using that as a pattern to glue the maribu feathers to. to cover the glue centre I used part of an old odd earring. Turned it upside down and hot glued it on, I think it looks like the centre of a fan so I'm pleased. 


 The women were just print outs from the internet I found at Magic Moonlight studios free images blog
http://magicmoonlightfreeimages.blogspot.com/ Blanca has a truly beautiful collection of vintage images that are free to use. So big thank you for putting them all in one place.
All I did was print them out on a basic printer in black and white. As I only used a basic printer the images weren't great but I inked them all over with a collection of distress inks, roughed up the edges with my nails as I don't have a distress tool. I curled and ripped some edges and just generally tried to make them look old. I  then mod podged over the top to mix the inks smoothing them out and make them look more like photographs. I also used some crackle accents to add a bit more texture.

 I think that is about it for this one but if there is anything I have missed that you want to know just give me a shout and I'll do what I can to answer. I have also put a video of this on youtube if you want to see more.

I 'll list the things I used to make it hopefully remembering it all as I didn't write it down d'oh.
Black acrylic paint
distress inks in - Frayed Burlap, walnut stain, vintage photo, tea dye, and linen(cant remember the full name)
Mulberry paper roses from thehobbyhouse.co.uk
Gold lollipop flower from Jennifer at Craftbrulee
Vintage images from the internet just printed on a normal printer not great quality
Tim Holtz ornate book plate
Adage ticket
Flowers I made from Book pages
Lace coloured with my home made glimmer spray
Taupe bling (can't really see the top one in this pic but its in the gap at the top right.
Paper from the Paris Nights stack by SEI
Black Maribu feathers and part of an old earring for the fan

Thank you for reading and have a great day
Han xx

Tuesday, April 5, 2011

Posing a question....and bending the rules

Hi all,
I have a question for you. I see the videos on Youtube about people participating in swaps and wonder how do I get involved? I'd love to join a group where I can send bits and pieces to other crafters internationally. Be it charms or mini pages or tags anything really.   I'd start my own little group doing swaps and such but I don't really have any one to include in it and I don't think sending myself things in the post has the same effect.

So if anyone is reading this please can you help a girl out? I'd love to become an involved member of a community of crafters but really don't know where to start.  As I said I'm more than willing to post internationally but I would love to strike up relationships with other crafters. I'm a bit (ok a lot) of a loaner as I don't really have anyone that shares my interests (scrapbooking, crafting, cake decorating, reading) and would love to make some crafting friends.

I know this is the second post in a row without project pictures but I'm working on a canvas at the moment and I think it's going on ok. I should finish it this week and I'll share it as soon as I do. But seeing as it's my blog and I can do what I want lol I'm going to post a picture of one of the cakes I've made.


I made this cake for a Friends brother in laws wedding. The sister of the groom was supposed to be doing the cake but decided that as she didn't decorate cakes that it was probably a bit much and I agreed to make it.  It isn't an original design but my take on a pink cake box cake. Hope you like it and thank you for looking.


Thank you for reading and for giving any advice if you have the time.

Love
Han x

Monday, April 4, 2011

And then there was a Haul.. an experiment and a work in progress...

Hi All, I've just finished a marathon of video posting on Youtube.  5 haul videos and a video about some homemade glimmer mists. When I started watching videos on youtube I never thought I would actually post something I made myself yet I find myself excited to do so. I have 4 subscribers too! Ok you may be thinking only 4, but to me those 4 are precious people I know it's just a click of a button but it's a click of a button for me and that makes me feel all warm inside. I am ever grateful for that contact with other people. 

I think I am almost done with my shopaholic moment for now. I had to do a little more this morning though, totally justified I assure you. I saw a video by Arlene at mybutterflykisses12 (I love Arlene!)  where she showed off a recent haul containing the pink paislee Butterfly Garden papers and I fell in love. Ensue panicked searching for somewhere in the UK that had them. Have I mentioned how difficult it is to get the things I see in the videos over here? It can be like living in a black hole! I managed to find them in the uk from Craftobsessions.co.uk, I've ordered from them before and have mentioned them in my haul vids so far. I got 2 each of the papers and the wood shapes and the metal charms and the rub ons. I also gave in and got the bo bunny Gabrielle collection and I mean I GOT the collection. I got  buttons and brads and chipboard and stickers. I am so excited I've never managed to find complete collections before. Usually just maybe the paper and some stickers but they have it all and I bought it all. I wasn't planning on spending anymore money and I will probably have to not get something else this month but I really think I had to do it. What if I had waited and they sold it all???? It's gorgeous it could happen!I'll make a video when I get them.

I spent the weekend in pain, some muscle relaxants later and I can move my head again but this means I haven't been able to craft as much as I would like, I had to content myself with making some home made glimmer mists instead. (sitting hunched over the desk while I crafted just wasn't happening as much as I tried) I watched about a million videos and gathered the basic principal. Water, glue, pigment, shimmer. So I set about making them, I don't think the formula is terribly specific and I switched and changed them time and time again. more water more shimmer more paint- too thick- pour half away add more water. I'm happy with the colours I got. I don't have perfect pearls so I used metallic paints and some cake decorating lustre dusts I had in my cake decorating stash. I like them I think they worked well. I urge everyone who hasn't tried to have a go. You get the custom colours you want and they work out a lot cheaper. Don't get me wrong I will still get some glimmer mists sometime in the future if I see a special one. Also I want to try the Tim Holtz method using the distress reinkers I just have to get some of those first!

Last night I felt up to crafting and decided to start an altered canvas project. It's a work in progress but as soon as it is finished I will take a picture and show you all. I'm also working on making something I can do a tutorial on but at the min I don't think there is anything I can do that other people haven't already done tutorials on. But I'll get there and when I have something worthy of showing I will. Wish me luck and I hope you have a great day.

Love
Hanx